
Even though I’m posting this in the early spring, this DIY art project is something that you and your kids can do anytime of the year! We love taking winter walks and having cold playground days. There is always an abundance of leaves on the ground which we love to stomp, crunch and kick our way through! So, I decided to take some of the big leaves home and use this opportunity to teach and play at the same time. I’d love to share this SUPER simple and fun winter nature activity!

Disclaimer: I am grateful to be of service and provide content that brings you value. I’m not a doctor or health care physician of any kind. This post may also contain affiliate links where I receive a small commission at no extra cost to you. See full disclosure for more details.
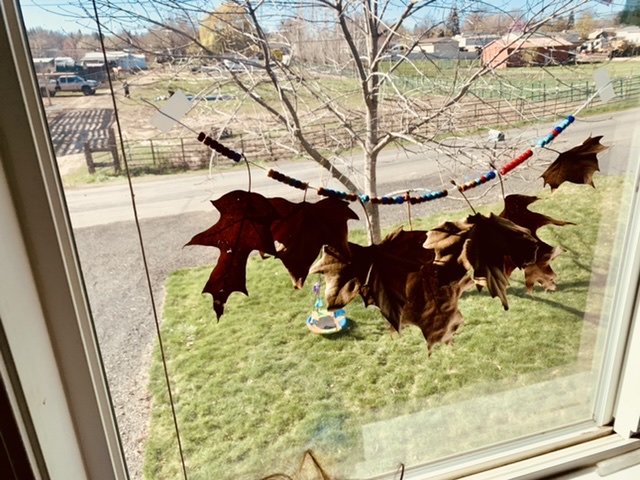
You’ll Need:
-Long string
-Nature specimens
-Beads of any kind (upcycled from an old necklace, thrifted for 50 cents, etc)
-Glue
First, we collected some SPECIMENS! Now this can be anything from dried leaves to roadside flowers. We probably will make another one for the springtime with all the dandelions my son picks on our walks.
Some great ideas could be…
-pinecones
-evergreen sprigs
-wildflowers
Next, I had him pick out three colors to put on his art project. You could do any number of colors, but this was a great opportunity to practice counting, color recognition, and even some shade variations! He chose red, blue, and brown. We didn’t bother with specifics like how many beads to put on and blah blah blah. Really, this was just something fun to do and we were figuring it out as we went along!

I made a semi-plan of how it was going to be laid out, so it wasn’t a complete hodge-podge of an art project.

After my outline, I had him lace the beads onto the string. A little note to help was I put a piece of tape around the end of to make it easier to thread the beads. Also, be sure to loop a simple knot at the other end so beads don’t fall off!

Now, my son isn’t super into art projects. I have to really hype it up for him to want to do it. Since he’s older now, he’s a little more excited about doing crafts, but it doesn’t last for long. After about 15 beads he wanted me to finish the rest.
I told him we could pause it and come back when he was ready.
This is such a good art project for fine motor skills too, since threading is a large part of it.

Once all the beads are on, seperate space between them for however many specimens you gathered.

Put a dot of glue on the space where you want the leaf, then wrap the string around it once so that it’s secure.
Then repeat the step above and just move the beads over as you go!

Then have them pick out a spot on the window or wall and hang it right up! We just taped ours because like I mentioned, we’ll probably update it when spring is in full bloom.

I took the opportunity to bust out our thrifted tree identifying book and we learned what kind of tree these particular leaves came from. We learned they were Maple and Oak trees from our local park! He seemed more interested in that part and matching the leaf to it coordinating tree in the book.

This is such an enjoyable seasonal art project. A fun time for learning about the seasons and their unique qualities! I haven’t started “homeschooling” per say, but I teach him random things here and there as they come up. He loves to know things right now, so any chance to share some knowledge is okay with me! I end up learning new things too!
What are you all learning about lately? Any fun seasonal activities you enjoy recently?


[…] always love an activity that takes us outdoors, and this is another […]